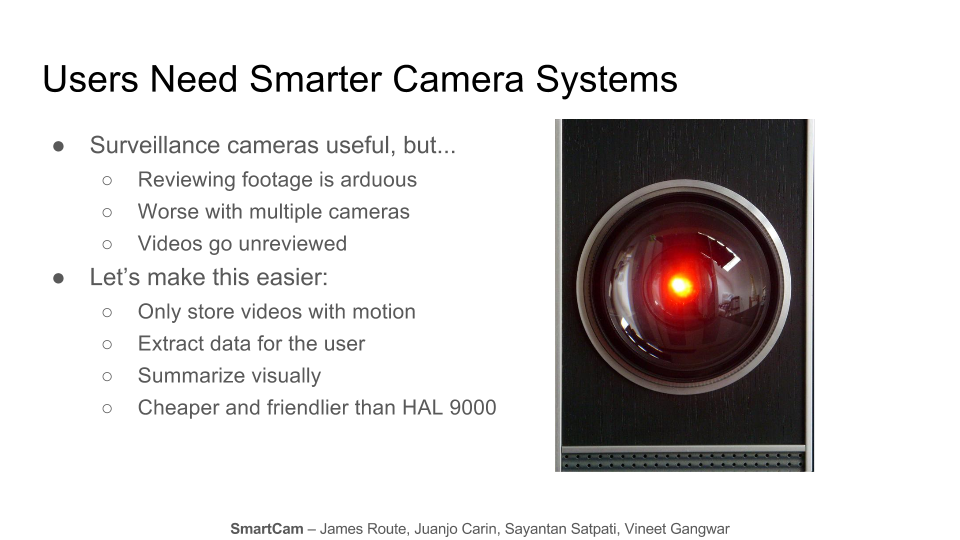
Surveillance cameras are the standard tool for homeowners and business operators who want to monitor their premises. But reviewing footage is an arduous task, especially for users with many cameras. Camera systems that are networked and offer a remote viewing interface are also expensive.
We designed an inexpensive, scalable camera system that harnesses computer vision and machine learning techniques to save home and business users time. Our system only records video footage that is likely to be useful (where motion is occurring) and shows the user a summary of the actual video contents, eliminating the need to skip through hours of footage. We offer the following features and advantages:
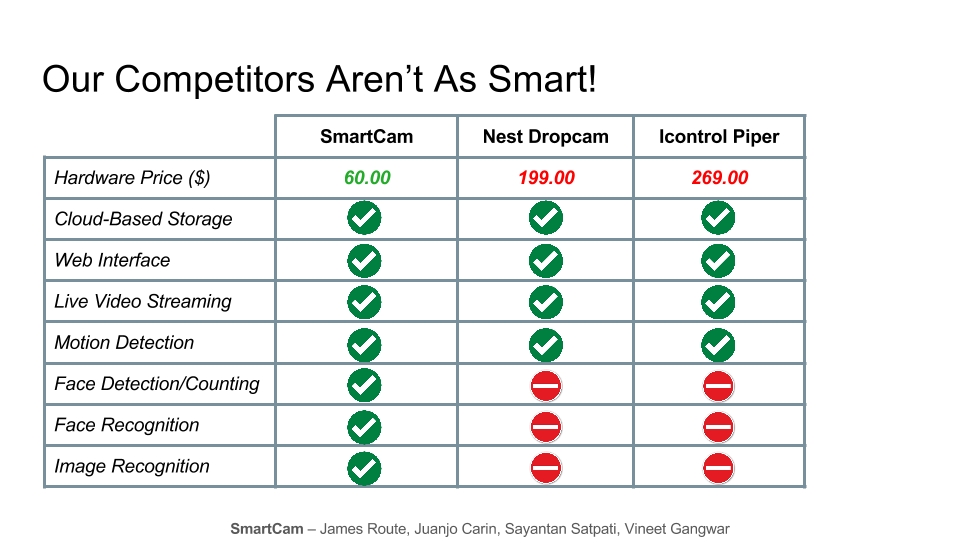
Inexpensive, commodity hardware based on the Raspberry Pi. The price of our hardware continues to drop, whereas existing “smart” cameras cost 100-200 dollars (two to three times ours).
Cloud-based storage and processing in Amazon Web Services. Our backend has near-unlimited storage and scales to work with any number of cameras.
Automatic motion detection. Our system only records video that contains motion, so you won’t waste time viewing blank footage.
Face detection and face counting. Want to know how much foot traffic is crossing through your store, or even home, at any point during the day? We can keep count and provide you a summary or detailed look at activity.
Image recognition. What occurred in-frame when the camera detected motion? Did a person walk by, or was it just a housepet? We’ll give you a quick summary so you don’t have to watch every video.
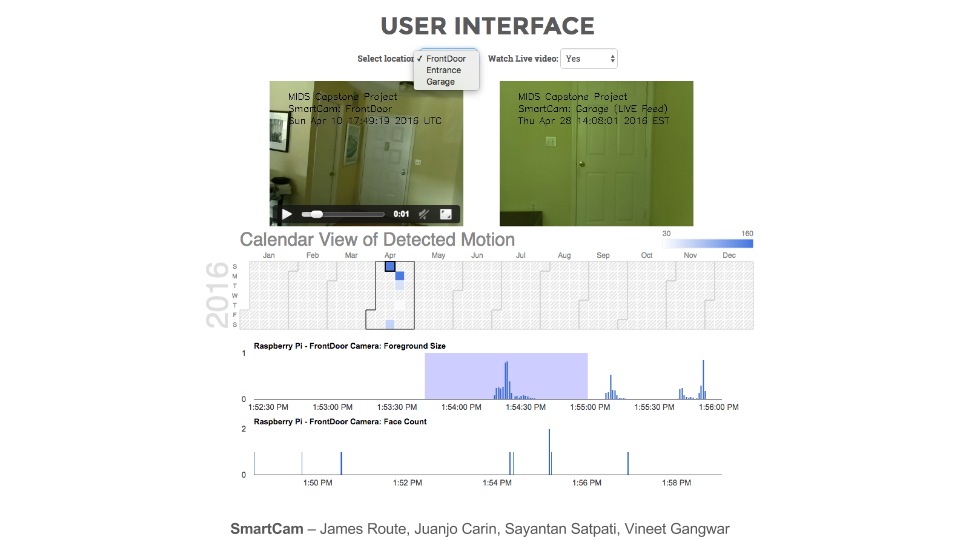
Web interface. Review data collected by our system and watch video footage from your computer or phone, from wherever you are.
Live data streaming. Monitor a camera in real time from your browser. You’ll see all the video frames, regardless of whether any motion is occurring.
Our Solution
How we built our solution (and why it works so well)
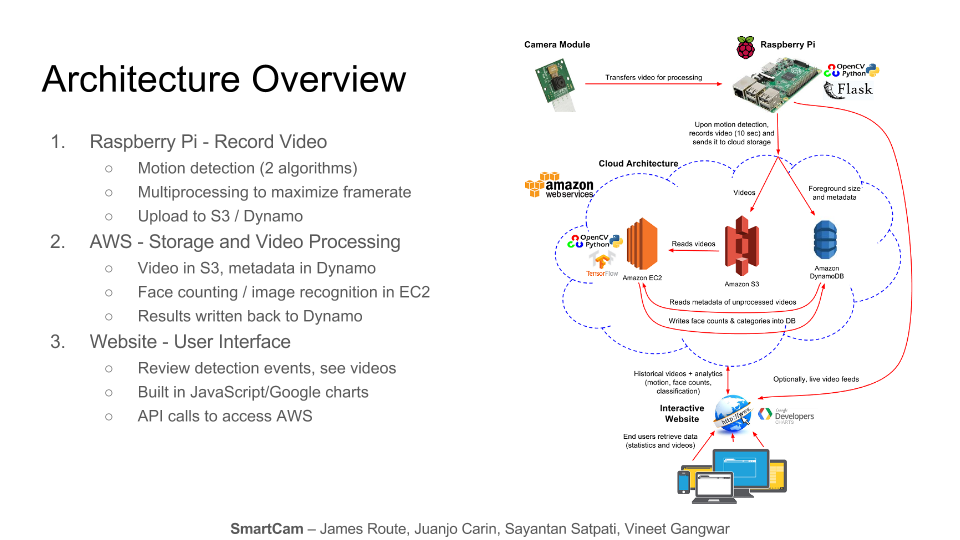
Architecture
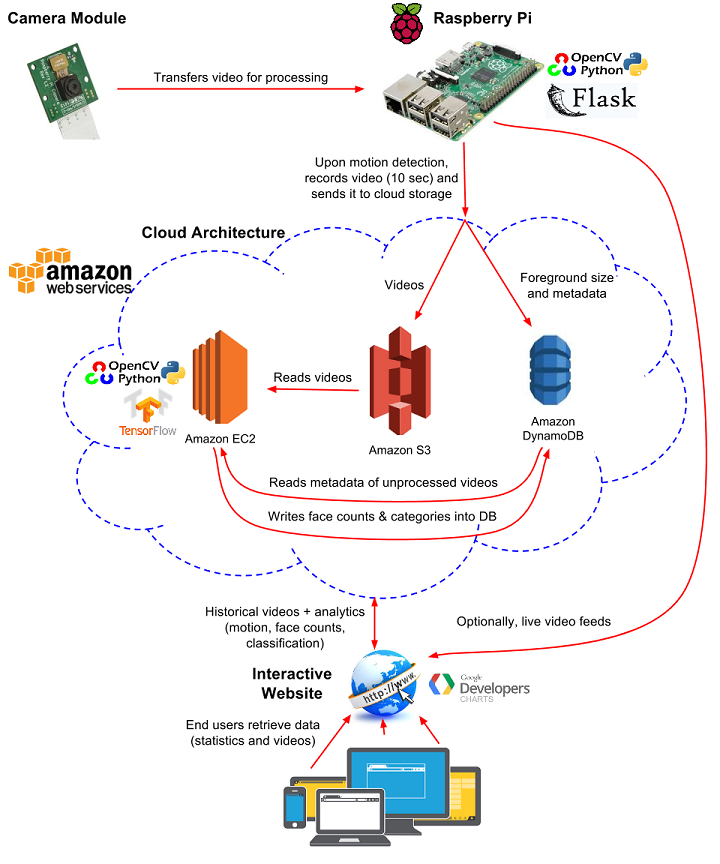
Our architecture, illustrated below, consisents of three major blocks:
Amazon Web Services (AWS) cloud infrastructure, comprising storage for video files, a database for metadata (e.g., source of video, timestamp, and information about contents), all of our backend video processing.
The Raspberry Pi processes incoming video frames from the camera module and performs motion detection using Python and the OpenCV library for video processing. The Raspberry Pi segments videos into 10 second files and uploads each file containing motion to a bucket in Amazon S3 and metadata (video source, timestamp) in JSON format to Amazon DynamoDB.
A Python script running in an Amazon EC2 virtual server queries DynamoDB for unprocessed videos, runs the face detection and counting algorithms on each video, and writes the results back to DynamoDB.
A second Python script running on a more powerful EC2 instance operates similarly, except it performs image classification on the video. We use a neural net trained using TensorFlow. The script samples frames from the video, obtains classification results from TensorFlow, and writes aggregated results back to DynamoDB.
The user can access all videos and information stored in S3 and DynamoDB through an interactive website (see below). The website allows a user to view video footage and data over a custom date range, as well as watch one of the Raspberry Pi cameras in real time.
Algorithms
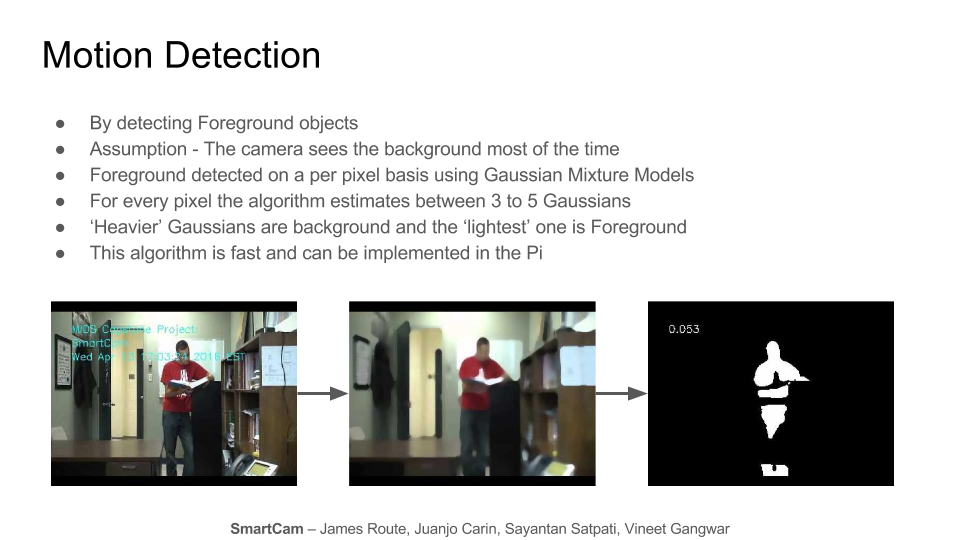
Motion Detection
Motion detection is an unsolved problem. There are many ways to approach motion detection. Our approach to motion detection uses two algorithms from the OpenCV library:
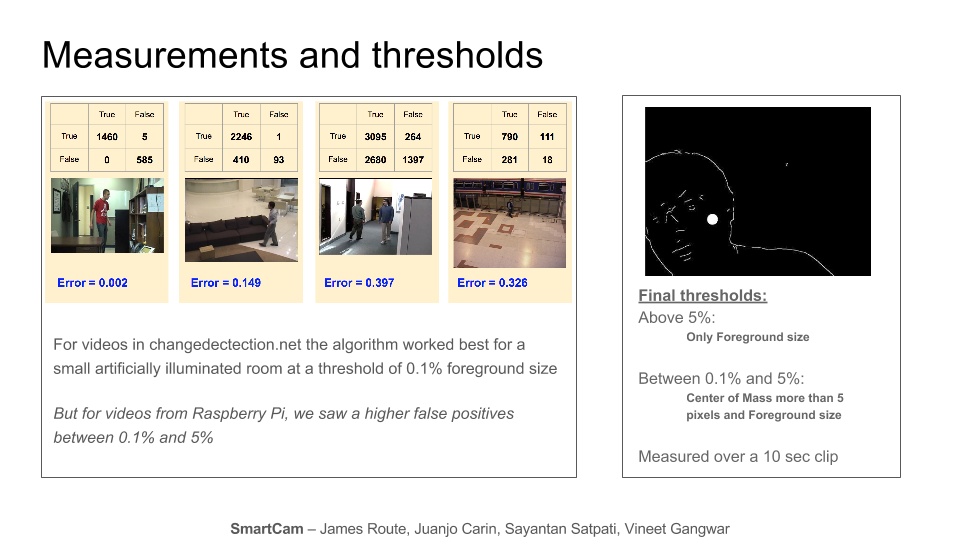
Background Subtraction using Mixture of Gaussians assumes that the camera sees the background most of the time and the foreground comes into the field of view intermittently. With this assumption, the algorithm estimates foreground pixel by pixel. Over a sliding window, for each pixel it estimates between 3 to 5 Gaussians. The Gaussians are weighted based on the number of data points they have. Pixels that fall in the ‘lighter’ gaussians are considered to be foreground. We trigger a frame to have motion if more than 5% of the pixels are foreground.
Each frame is blurred using median blurring before this algorithm is applied. The below videos shows this in action.
When the foreground pixels are between 0.1% to 5% we have applied an additional filter to reduce noise. First, we use Canny edge detector to detect edges in a frame. Then, we calculate center of mass of the edges. This can be seen in action in the below video.
When the foreground is between 0.1% to 5% motion is triggered if the center of mass also moves by more than 5 pixels between each second
Motion detection can be further improved by estimating depth of image. Changes in depth in the field of view along with foreground detection and change in center of mass of edges has the potential of providing a highly accurate method for detecting motion
Face Detection
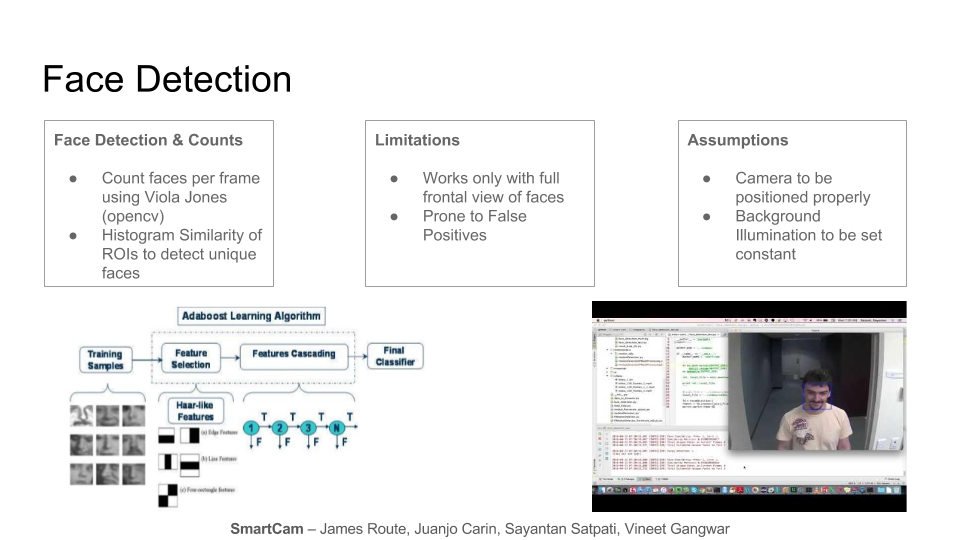
Face Detection is done using an opencv implementation of the Viola Jones algorithm. The algorithm uses the following 4 broad concepts to do face detection:
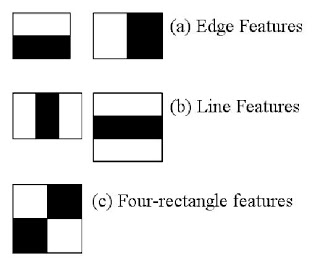
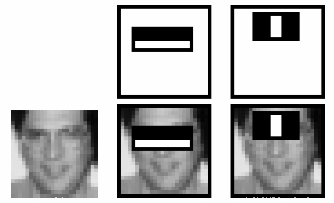
HAAR Features: These are like convolutional filters which can be thought of as small rectangles with black/white regions that can slide over the entire image and each feature is a single value obtained by subtracting sum of pixels under white rectangle from sum of pixels under black rectangle.
Integral Image: Now all possible sizes and locations of each kernel is used to calculate plenty of features. (Even a 24x24 window results over 160000 features. Just imagine how much computation it needs?). For each feature calculation, the algorithm needs to calculate the sum of pixels under white and black rectangles. To solve this, integral images was introduced which simplifies calculation of sum of pixels - how large may be the number of pixels, this operation involves just four pixels from all four corners of the region. It makes things super-fast.
Adaboost: Among all these features calculated, most of them are irrelevant. So what is the best way to select the best features out of 160000+ features? It is achieved by Adaboost learning algorithm. The paper says even 200 features provide detection with 95% accuracy. The final setup had around 6000 features. (Imagine a reduction from 160000+ features to just 6000 features. That is a big gain)
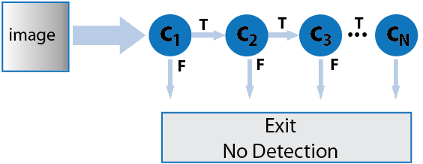
Cascade of Classifiers: Instead of applying all the 6000 features on a window, the idea is to group the features into different stages of classifiers and apply one-by-one. (Normally first few stages will contain very less number of features). If a window fails the first stage, it is discarded and remaining features are not considered. If it passes, apply the second stage of features and the process is continued. The window which passes all stages is detected as a face region. Authors' detector had 6000+ features with 38 stages with 1, 10, 25, 25 and 50 features in first five stages. (Two features in the above image is actually obtained as the best two features from Adaboost). According to authors, on an average, 10 features out of 6000+ are evaluated per sub-window.
Face Detection using Viola Jones is extremely fast and works in near real time. Faces are detected in each frame (of the video/stream), and since the same faces can appear in subsequent frames, Histogram Similarity of the Regions of Interests between subsequent frames is used to count the number of unique faces per frame.
The following video snippet provides a glimpse of how face detection and counting is done in the cloud. Blue rectangles (Regions of Interest: ROI) show up on the faces once they are detected in any frame.
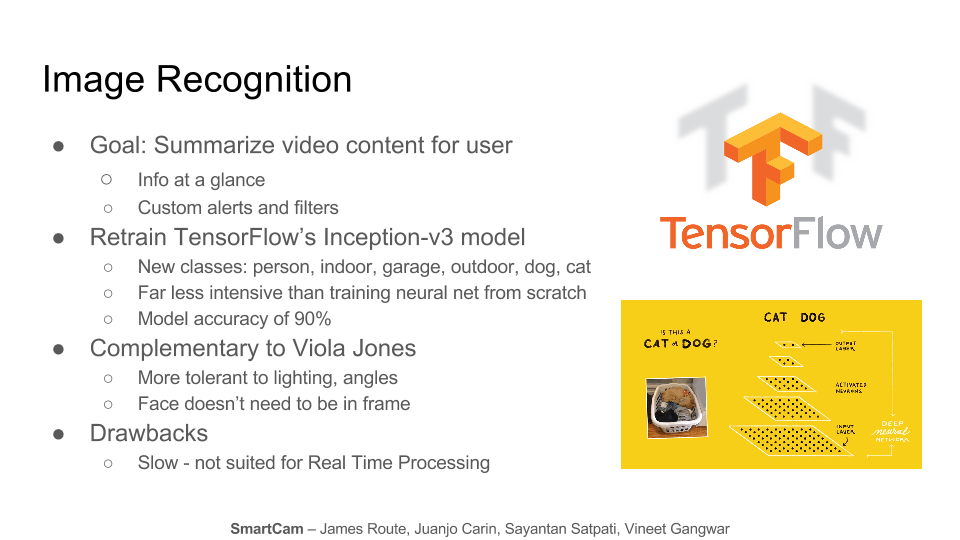
For classifying the images/frames within the uploaded video, a technique called transfer learning was used which basically involved retraining the final layer of TensorFlow’s Inception_V3 Model, that was originally trained on the ImageNET dataset. Modern object recognition models have millions of parameters and can take weeks to fully train. Transfer Learning retrains from the existing weights for new classes while leaving all the others untouched. Currently, the images/frames are classified into 6 classes/categories: person, indoor, garage, outdoor, dog, cat, which can be enhanced and/or improved by training on a cluster of GPUs with a richer training set. We used handcrafted training data with images from open data sources (Find Below), and ones generated by our Raspberry Pis, and labeled them into one of the 6 categories.
Even with a limited training data of 100 odd images / category, the accuracy that Tensor Flow reported, during training, was as high as 90%. While results may not be as good as the fully trained model, transfer learning is surprisingly effective for many applications, such as ours.
This feature complemented Viola Jones nicely, since it is much more tolerant to lighting, and face/body postures - no longer we were restricted to faces to identify a human. However, in its current form, it is slow and takes almost half a minute to process a single frame, and is therefore not suited for real time processing.
Would you like to know more about this project or our team? Check out our backend code and frontend code or contact us and we’ll be glad to tell you more.